-
3월 17일 복습그린컴퓨터디자인 학원 복습 및 정리 2025. 3. 17. 20:15
과제 예시 설명)
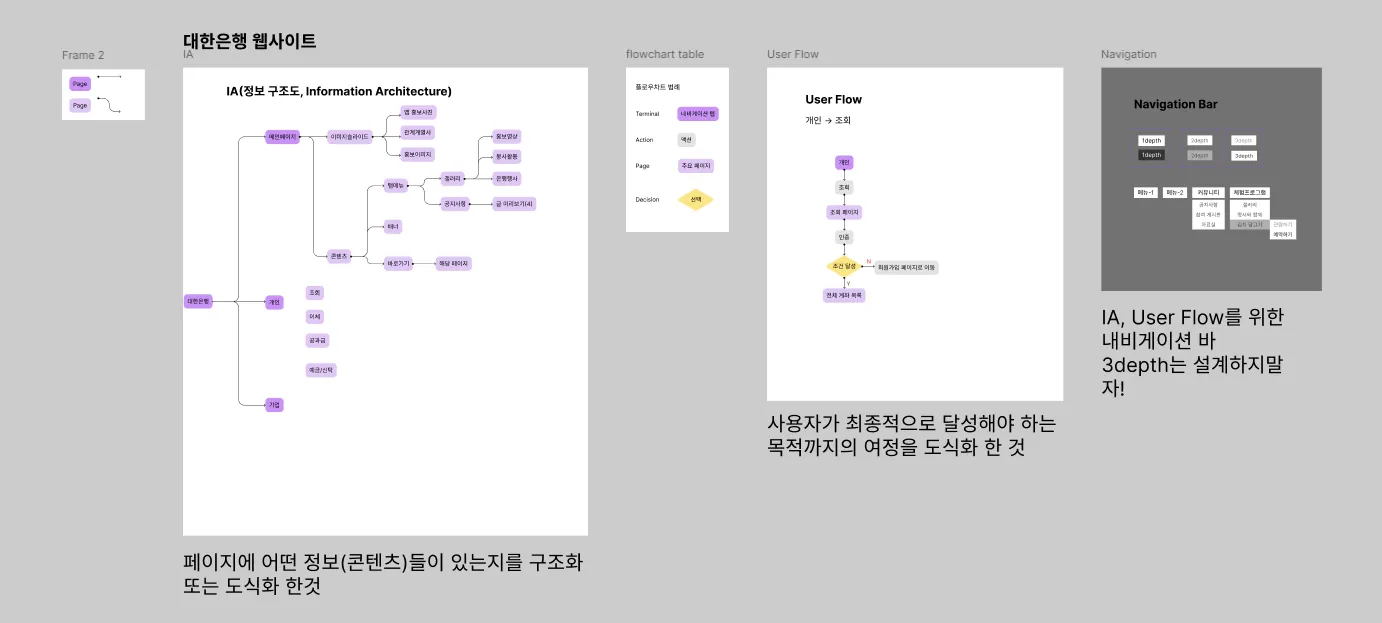
IA : 페이지에 어떤 정보(콘텐츠)들이 있는지를 구조화 또는 도식화 한 것
A-1 또는 B-1 유형의 메인페이지 정보구조도 만들어보기
(예시는 옆으로 되어있지만 아래로 펼치는 방식으로 만들기)
User Flow: 사용자가 최종적으로 달성해야 하는 목적까지의 여정을 도식화 한 것
Navigation Bar: IA, User Flow를 위한 내비게이션 바
(3depth는 설계하지말자, 2depth까지만)
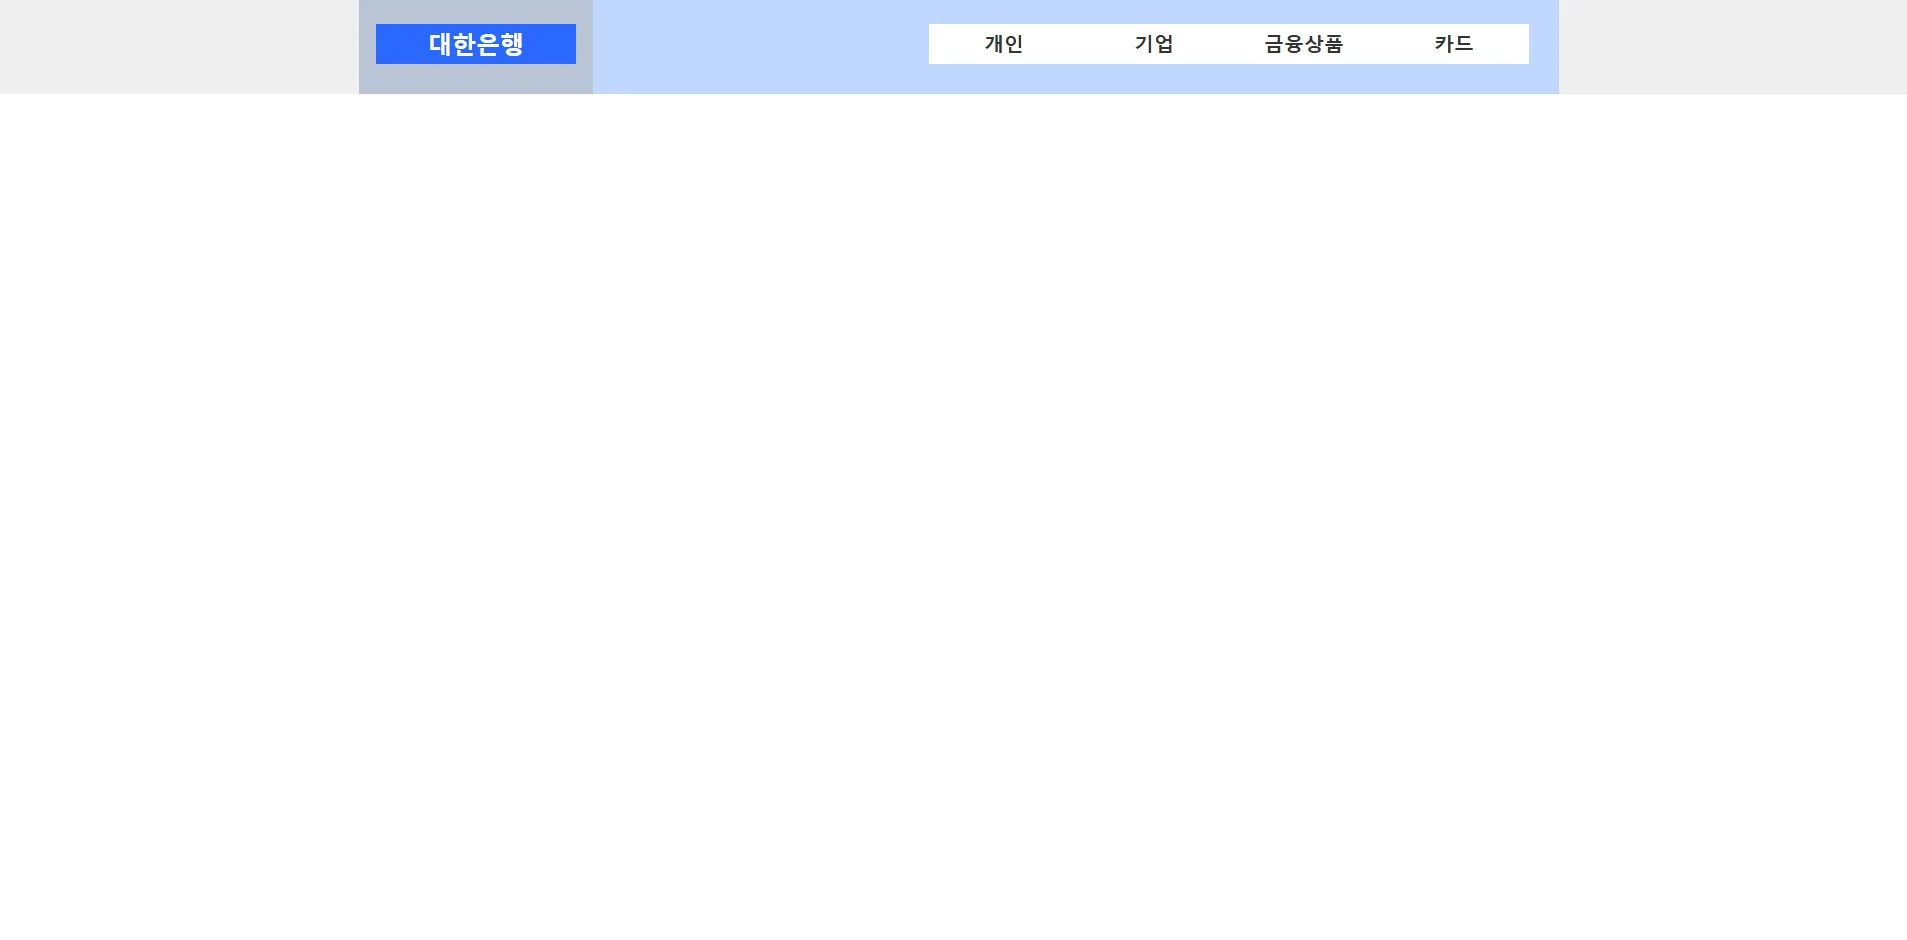
<!DOCTYPE html>
<html lang="ko">
  <head>
    <meta charset="UTF-8" />
    <meta name="viewport" content="width=device-width, initial-scale=1.0" />
    <title>B-1 유형 레이아웃</title>
    <link rel="stylesheet" href="css/style.css" />
    <script src="js/script.js"></script>
  </head>
  <body>
    <div class="wrap">
      <header class="header">
        <div class="inner">
          <a href="#" class="logo">
            <span>대한은행</span>
          </a>
          <nav class="menu">
            <div class="submenu-bg"></div>
            <ul class="navi">
              <li>
                <a href="#">개인</a>
                <ul class="submenu">
                  <li><a href="#">조회</a></li>
                  <li><a href="#">이체</a></li>
                  <li><a href="#">공과금</a></li>
                  <li><a href="#">예금/신탁</a></li>
                </ul>
              </li>
              <li>
                <a href="#">기업</a>
                <ul class="submenu">
                  <li><a href="#">조회</a></li>
                  <li><a href="#">이체</a></li>
                  <li><a href="#">전자결제</a></li>
                  <li><a href="#">수표/어음</a></li>
                </ul>
              </li>
              <li>
                <a href="#">금융상품</a>
                <ul class="submenu">
                  <li><a href="#">저축상품</a></li>
                  <li><a href="#">대출상품</a></li>
                  <li><a href="#">투자상품</a></li>
                </ul>
              </li>
              <li>
                <a href="#">카드</a>
                <ul class="submenu">
                  <li><a href="#">카드정보</a></li>
                  <li><a href="#">카드신청</a></li>
                  <li><a href="#">이용내역조회</a></li>
                </ul>
              </li>
            </ul>
          </nav>
        </div>
      </header>
    </div>
  </body>
</html>
/* 기본 스타일 초기화 */ * { margin: 0; padding: 0; box-sizing: border-box; } html, body { font-size: 16px; color: #333; background-color: #fff; } a { display: block; text-decoration: none; color: #333; } ul, li { list-style: none; } img { border: 0; vertical-align: middle; } .wrap { width: 100%; height: 700px; } .inner { width: 1200px; margin: 0 auto; background-color: #fff; } .header { position: relative; width: 100%; height: 100px; background-color: #eee; } .header .inner { position: relative; height: 100%; display: flex; align-items: stretch; } .logo { position: relative; background-color: #b9c4d5; flex: 1; display: flex; justify-content: center; align-items: center; } .logo span { display: block; width: 200px; /* height: 40px; */ background-color: #0066ff; text-align: center; line-height: 40px; color: #fff; font-size: 24px; font-weight: bold; } .menu { position: relative; background-color: #bcd7ff; flex: 4; display: flex; justify-content: flex-end; align-items: center; padding-right: 30px; } .submenu-bg { position: absolute; top: 70px; right: 30px; width: 600px; /* height: 200px; */ height: 0; background-color: #d2d2d2; z-index: 1; transition: height 0.5s; } .navi { position: relative; display: flex; z-index: 2; } .navi > li { position: relative; } .navi > li > a { width: 150px; line-height: 40px; text-align: center; font-size: 20px; font-weight: bold; background-color: #fff; } .navi > li:hover > a { background-color: #636363; color: #fff; } .submenu { position: absolute; top: 40px; left: 0; /* height: 200px; */ height: 0; overflow: hidden; transition: height 0.5s; } .submenu li { } .submenu li a { width: 150px; line-height: 40px; color: #666; font-size: 18px; text-align: center; } .submenu li a:hover { background-color: #636363; color: #fff; }transition: height 0.5s; : 0.5초동안 높이만큼 보이게 하기
:hover : 마우스 올렸을 때
submenu와 submenu-bg에 height 값을 0으로 설정한 건 마우스 올렸을 때 나타나게 하기 위해서다.
https://codepen.io/qikddukq-the-flexboxer/pen/ogNEbEv
B-1 header
...
codepen.io
문자열 string
<!DOCTYPE html>
<html lang="ko">
  <head>
    <meta charset="UTF-8" />
    <meta name="viewport" content="width=device-width, initial-scale=1.0" />
    <title>문자열 string</title>
  </head>
  <body>
    <script>
      const text1 = "사과";
      const text2 = "오 렌 지";
      console.log("안녕!");
      console.log(text1);
      console.log(text2);
      console.log("안녕", text1, text2);
      console.log(text1.length); // text1의 길이
      console.log(text2.length); // text2의 길이

      const text3 = '내 이름은 "홍길동"입니다.'; // 쌍따옴표를 출력 할 경우 따옴표 앞에 백슬래시 (\” 이름 \”)를 쓰고 저장한다.
      console.log(text3);

      const userName = "홍길동";
      const age = 30;
      const text4 = "이름: " + userName + ", 나이: " + age; // 이름 : 홍길동, 나이 : 30
      const text5 = `이름: ${userName}, 나이: ${age}`; // 벡틱 안에 변수는 ${} 안에 적어준다.
      console.log(text4);
      document.write(text4 + "<br>"); // 화면에 나올 때 사용, 태그도 넣을 수 있다.
      document.write(text5);
    </script>
  </body>
</html>
const : 변하지 않는 값 “홍길동이라는 값은 userName이라는 변수에 담겨있다.”
let: 변하는 값
콘솔 출력시 문자열은 따옴표, 변수는 따옴표없이 그냥 적어준다.
여러개를 출력할 때, 괄호 안에 콤마(,)를 사용해서 적어준다.
문자열은 공백도 포함한다.(공백출력됨)
쌍따옴표를 넣을 경우 \” 이름 \”을 쓰고 저장한다.
https://codepen.io/qikddukq-the-flexboxer/pen/raNJxYZ
문자열 string
...
codepen.io