개발일지
이미지가 삽입된 로그인 페이지 유형
유니크샤인
2021. 6. 29. 15:16
1.기존에 있던 로그인 페이지를 불러온다.
<!DOCTYPE html>
<html lang="en">
<head>
    <meta charset="UTF-8">
    <title>로그인페이지</title>

</head>
<body>

        <h1>로그인 페이지</h1>
        <h5>아이디, 패스워드를 입력해주세요</h5>


    <p>ID: <input type="text"></p>
    <p>PW: <input type="text"></p>
    <button>로그인하기</button>


</body>
</html>
2. head 태그에 style을 넣어준다.
<!DOCTYPE html>
<html lang="en">
<head>
    <meta charset="UTF-8">
    <title>로그인페이지</title>
   <style>

   </style>
</head>
<body>

        <h1>로그인 페이지</h1>
        <h5>아이디, 패스워드를 입력해주세요</h5>


    <p>ID: <input type="text"></p>
    <p>PW: <input type="text"></p>
    <button class="mybtn">로그인하기</button>


</body>
</html>
3. body 태그안에 있는 태그들을 div 태그로 묶어주고, 각각 클래스 선택자를 지정해 준다.
<body>
    <div class="wrap">
    <div class="mytitle">
        <h1>로그인 페이지</h1>
        <h5>아이디, 패스워드를 입력해주세요</h5>
    </div>

    <p>ID: <input type="text"></p>
    <p>PW: <input type="text"></p>
    <button class="mybtn">로그인하기</button>
    </div>

</body>
4. 스타일을 지정해준다.
<style>
.mytitle{
background-color: green;
width: 300px;
height: 200px;
color: white;
text-align: center;
background-image: url("https://www.ancient-origins.net/sites/default/files/field/image/Agesilaus-II-cover.jpg");
background-size: cover;
background-position: center;
border-radius: 10px;
padding-top: 20px;
}
.wrap{
width: 300px;
}
.mybtn{
width: 100px;
}
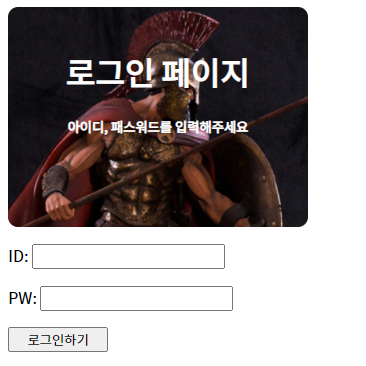
</style>★background-color를 지정해 준 이유는 해당 선택자의 크기를 맞추기 위해 눈으로 보기 쉽게 표시했다.
background-size는 cover로 설정해 이미지 크기를 맞췄고, background-position은 center로 지정해서이미지를 중앙으로 오도록 만들었고, border-radius를 줘서 사각형에 곡률을 줬다.또한 Padding-top을 통해 안쪽에서 20px를 띄웠다.